
Samsung wants to help you become a rock star developer

Meet Derek. He's a struggling mobile developer who can't seem to get the ideas from his head onto his phone. When he's finally had enough, his cries for help are answered by a glittering magic envelope — an invitation to the Samsung Developers Conference. Soon his problems are overcome, he's the envy of his co-workers, and he owes it all to the Dev conference and the Samsung SDK.
Ok, the premise is over-the-top a little bit. Or a whole lot. But the idea here is to get you — the potential app developer for Samsung's Android-based phones — excited for this week's event. Combine that with Samsung's recent flair for the dramatic, and you get these shorts.
Hit the break, watch through the playlist, and get ready for a lot more — both informative and entertaining — stuff from Samsung in the days to come.
Root LG Optimus G on Android 4.1.2 Jelly Bean Firmware
When the Optimus G was released in November 2012, it was seen as a powerful contender to challenge the Galaxy S3. It introduced several new features that looked far more superior to S3 but quite mysteriously the device failed to do the magic for its maker. TheOptimus G is definitely a powerhouse in itself and if you own this smartphone, you can make it even more efficient byrooting.
Some of the reasons why rootingbecomes so important for an Android device user is the possibilities it offers. Having a rooted device, you can do things that those with a non-rooted device can only dream off. You can install some really useful apps that require root access on your device. These app can help you improve your phone’s performance, get betterbattery life, remove bloats, backup your device’s data, move apps to SD card and so on.
The advantages of owning a rooted phone does not end up here. You can also choose from a lot of custom ROMs that offer more features and better performance out of your device. If you do not have a rooted device, you have not yet tasted the whole of Android. To know more about rooting and different perspectives associated with it, you can read our detailed articles:
So, if you are are interested in rooting your LG Optimus G, we are here with an easy root tool-kit that can do the job very smoothly and safely. The root method works on all Optimus G devices that do not have locked bootloader and have Android 4.1.2 Jelly Bean firmware installed on them. You should also be aware of the fact that rooting an Android device voids its warranty and the procedure of achieving might prove risky if you do not follow it carefully.
Preparations:
- Download the rooting package for the Optimus G: Motochopper.Zip
- Download and install LG USB Drivers on your computer
- Rooting usually does not wipe your phone’s data and apps but it is strongly recommended that you create a backup of your contacts, messages, apps, etc.
- Turn on USB Debugging on your Optimus G from Settings> Developer Options.
- Make sure your phone has good level of battery left on it before you proceed.
Step-by-Step Guide to Rooting Optimus G:
- Extract the “motochopper.zip” file on your computer.
- Connect your Optimus G to computer using a USB cable.
- Now double click the “run.bat” file.
- Doing this will prompt a command window like shown above. Just hit the Enter key on your computer’s keyboard.
- The Super User will be flashed to your phone and it will then reboot automatically.
Rooting Optimus G on Mac and Linux:
The method can also be used to root Optimus G on Mac and Linux but for that, you;ll have to launch a terminal window and type the following command:
cd Downloads/motochopper cd motochopper chmod 755 * sudo sh run.sh
When the Optimus G boots up, it should have root access. You can verify the root by installing a free app called Root Checker from the market and running it.
In case, your phone does not boot up normally after following the above procedure, long press the Power Key of your device and repeat the steps described above. If you have any question or doubts related to the topic, do share with us via comments below!
Root and Install ClockworkMod Recovery on Samsung Galaxy Note 3 SM-N900
After buying a new smartphone, the first thing we begin to look for a working method of rooting it. In most cases, our developers are fast enough to come with a rooting exploit within hours of a device’s release, and when it is aSamsung Galaxy flagship, it is just obvious that we look to one man, Chainfire.
CF-Auto-Root packages by Chainfire are the most known tools for rootingSamsung devices, and this time too the man is back in time with his weapon to gain root access on the Galaxy Note 3. With the release of his rooting package, it’s has now become very easy to root this new phablet device in just a few clicks. In the present guide, we would not only tell how how to root the Galaxy Note 3 SM-N900, but also describe the steps to install CWM Recovery on it.
Disclaimer:
The procedure given below is considered risky and so it must not be taken for granted.Rooting voids the warranty of your device and the method might put your phone at risk. In case of any mishap, DroidViews or the developers will not be liable for the same. You are the master of your phone and decision both.
Prerequisites:
Here are a few things to be taken care of before you move on to the real action. Please do not miss even a single item to avoid failure.
- Download the Odin tool and unzip the file: Odin3_v1.85.Zip
- Download Chainfire’s rooting package for the Galaxy Note 3 and extract the zip: CF-Auto-Root-Ha3g-Ha3gxx-Smn900.Zip
- Download CWM recovery for Note 3 SM-N900: N900-Cwm-Recovery-6.0.3.8(0929).Tar
- Make sure you have install Samsung USB Drivers Or Kies on your computer.
- Turn on USB Debugging on your device by going to Settings> General> Developer options.
Rooting Galaxy Note 3:
- Boot your Note 3 into Download Mode. To do so, turn off your device and then press and hold the Volume Down + Home + Power buttons simultaneously for 2-3 seconds. When you see the warning screen, press Volume Up to continue to the Download Mode.
- Launch Odin and connect your phone to computer via USB cable. Wait till Odin detects your device. This is signaled by the ID:COM port turning to Blue and “Added!!” text at the message box on Odin.
- Make sure that only Auto Reboot and F. Reset Time option are checked on Odin.
- Click the PDA button and select the CF-Auto-Root file with .tar.md5 extension.
- Finally, click the Start button to initiate installation.
- CF-Root will be installed to your device in a matter of seconds and then you will see PASS!! message on Odin followed by automatic device reboot.
- Disconnect the USB cable and wait till the device reboots.
Go to your phone’s app drawer. You should now see a new app called “SuperSU” there. This indicates that your device has root access now. To further verify it, install the Root Checker app from the Google Play Store and run it.
Installing CWM Recovery on Note 3:
Having rooted your Galaxy Note 3, you can also install ClockworkMod recovery on it. Please note that this step is mandatory. Install a custom recovery only if you wish to install a custom ROM or mod, or backup your ROM. as for the installation method for the CWM file, it is the same as the rooting part. Just repeat all the steps from above. The only thing to be be careful about this time is to select n900-cwm-recovery-6.0.3.8(0929).tar file at the 4th step when you click the PDA button.
Install Android 4.3 Jelly Bean Leaked Firmware on Galaxy S4 LTE GT-I9505
The users of Samsung Galaxy S4 have been patiently waiting for the latest version of Android to come their way for a long time. The rumors of Android 4.3 Jelly Bean update for the device, by the end of October, have finally started realizing and the leaked Android 4.3 test firmware for the Galaxy S4 can be taken as a solid confirmation. If you have any variant of the device, you’ll have to wait a little more to get the new taste of Jelly Bean. However, if you own the LTE version of the Galaxy S4 with model number GT-I9505, the treat has arrived for you in its raw form.
Usually, Samsung takes a little longer time in sending the latest Android updates to its flagships, but this time it has taken just about 2 and half months. The available Android 4.3 firmware I9505XXUEMI8 is the leaked version of the official one and therefore it might or not be as stable in performance as an official release should be. We tested this firmware on our S4 and having used it for more than 40 hours, we can say that except for some Wi-Fi connectivity issues now and then, it is good as a whole. Keep in mind that it is a “test” and “taste” firmware both, so do not expect perfection!
Warning:
The Android 4.3 based I9505XXUEMI8 firmware is meant only for Samsung Galaxy S4 LTE GT-I9505. Do not dare try it even in dreams, if you have some other variant of the Galaxy S4. Install the firmware to your device at your own risk. We’ll not be responsible for any damage done to your phone.
Download the Firmware:
The firmware given below has OXA as CSC, and that means it is an unbranded firmware for Open Europe. It can be installed on any unbranded Galaxy S4 LTE GT-I9505 that is not locked to a carrier.
Things to Do Before Installing:
If you have decided to try Android 4.3 leaked firmware on your phone, you’re welcome. But before you actually do it, there are few precautions to be taken and preparations to be made.
- Download the firmware file from above and extract the zip on your desktop. Inside the extracted folder, you’ll see four files:
- AP_I9505XXUEMI8_1715731_REV06_user_low_ship_MULTI_CERT.tar.md5
- BL_I9505XXUEMI8_1715731_REV06_user_low_ship_MULTI_CERT.tar
- CP_I9505XXUEMI8_1715731_REV06_user_low_ship_MULTI_CERT.tar.md5
- CSC_OXA_I9505OXAEMI8_1715731_REV06_user_low_ship_MULTI_CERT.tar.md5
- Download Odin3 3.09 and extract the zip file: Odin_v3.09.Zip
- Install Samsung USB Drivers Or Kies on your computer. If you have installed Kies, make sure it is not open while installing the firmware.
- Installing the new firmware might wipe your phone’s data. Backup the apps, contacts, messages and other data present on the internal SD of your phone. You can use These Apps To Backup Your Device easily.
- Charge your Galaxy S4 to 60% of battery level.
Installing the Firmware Using Odin:
If you have never used the newest version of Odin, that is ver. 3.0.9, here are the steps you need to follow to install the firmware.
- Boot your Galaxy S4 in Download Mode: press and hold Volume Up + Home + Powerkeys at the same time for 2-3 seconds and when you see the warning screen, pressVolume Up.
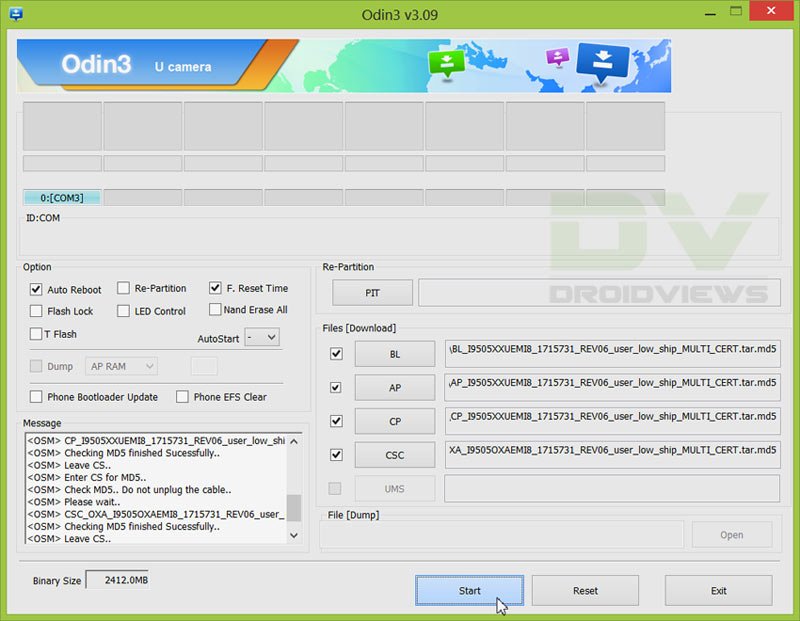
- Launch Odin3_v3.0.9.exe and connect your phone to PC via USB cable.
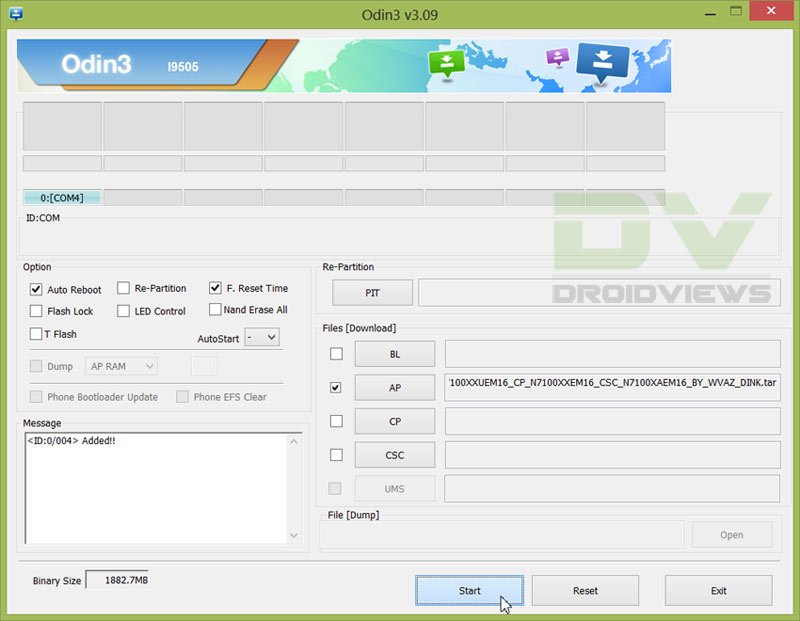
- When Odin detects your device, you’ll see light Blue signal on Odin and “Added!!” text in the message box.
- Make sure that only Auto Reboot and F Reset Time options are selected in Odin.
- Now click on BL button and select“BL_I9505XXUEMI8_1715731_REV06_user_low_ship_MULTI_CERT.tar”.
- Click the AP button and select“AP_I9505XXUEMI8_1715731_REV06_user_low_ship_MULTI_CERT.tar.md5″.
- Then click on CP and select“CP_I9505XXUEMI8_1715731_REV06_user_low_ship_MULTI_CERT.tar.md5″.
- Then click on CSC button and select“CSC_OXA_I9505OXAEMI8_1715731_REV06_user_low_ship_MULTI_CERT.tar.md5″
- Make sure your Odin screen looks like our attached screenshot:
- Finally, click the Start button on Odin.
- Let the installation finish. When it completes, you will get PASS!! message with Green signal and our phone will reboot automatically.
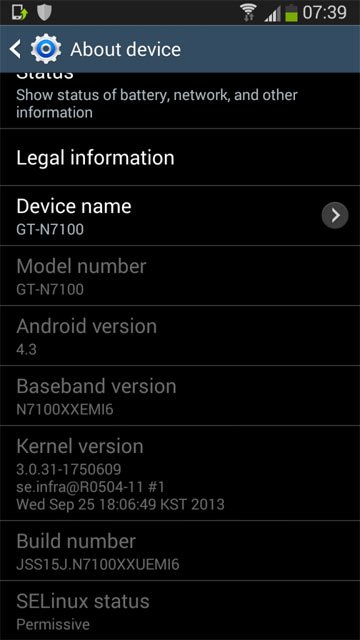
When the phone boots up, it will be running the newly installed Android 4.3 Jelly Beanfirmware. Congrats!
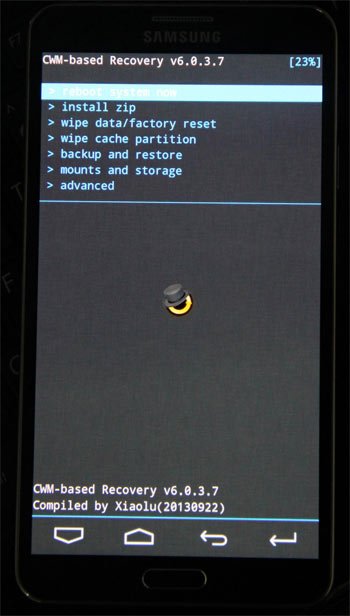
Fixing Bootloop or Buggy Performance:
Suppose your phone gets into a bootloop after installing the new firmware, or you experience slow and buggy performance, do the following steps and everything should be fine:
- In case of bootloop: pull the battery of the device, wait for a minute and put the battery back to its place.
- In case of slow performance: turn off your Galaxy S4
- Now boot your phone into Recovery mode: press and hold Volume Up + Home + Powerbuttons together. Keep the keys pressed till the Samsung logo appears and disappears for 2 times. Now release the Power key while keeping other 2 keys pressed till you see a menu with blue text.
- When you are in Recovery mode, select the volume keys to scroll and power key to select options.
- Go to “wipe data/factory reset” option and select “yes”.
- Similarly, scroll to “wipe cache partition” and wipe it too.
- Finally, select “reboot system now”.
Try Android 4.3 Leaked Firmware (N7100XXUEM16) on Samsung Galaxy Note 2 (GT-N7100)
In the previous post, we shared the Android 4.3 leaked firmware for theSamsung Galaxy S4 LTE, and now there is one more test firmware out for the international Galaxy Note 2 GT-I7100. Such leaks of the latest Android basedfirmware clearly indicate that Samsung has been testing Android 4.3 on some of its older flagships like the Galaxy S4. S3 and Note 2 and also that the official release of the new update is just a matter of weeks. If you own the Galaxy Note 2, however, you can try the Android 4.3 firmware right away to get an idea what it’ll be like in its final release.
Android 4.3 update will be a major jump for the users of the device who have been using Android 4.1.2 for a long time and seen no significant update for months. As it is a test firmware, it is sure to have some bugs, but to believe the users who have already tested it, the N7100XXUEM16 firmware is pretty stable and brings a host of new features to the device.
New Features and Changes:
- New lockscreen with multi-page and widget support
- New calculator
- New gallery
- Group play
- Updated S voice
- S Planner looks a bit different
- Messaging app opens faster
- Some new icons
- New music player with old icon
- Text looks sharper
- Knox
- New tabbed UI in Settings
- Daydream
- New Quick Settings page available in Notification panel
- Notification center don’t stutter like bitch anymore if u got a lot of notifications
- Adapt sound
- Adapt display + professional mode
- Some new widgets
- Galaxy s4 ringtone
Download:
Here are the details of a available Android 4.3 firmware for Samsung Galaxy Note 2 GT-I7100.
Region: Open Europe
Version: Android 4.3
Build date: Fri, 25 Sep 2013
PDA: N7100XXUEMI6
CSC: OXA
MODEM: N7100XXUEMI6
Version: Android 4.3
Build date: Fri, 25 Sep 2013
PDA: N7100XXUEMI6
CSC: OXA
MODEM: N7100XXUEMI6
Download the firmware from below and extract the zip file on your computer. When you are asked to type a Password to unzip the file, enter: wagnervaz
Warning:
The firmware provided on this page is only meant for Galaxy Note 2 with model number GT-N7100. Please check your phone’s device info from Settings> About and proceed only when you are sure. Install the firmware at your own responsibility. Installing the firmware will wipe the data of your phone, so backup them first.
Preparations to be Made:
- Download Odin toll and extract the zip: Odin_v3.09.Zip
- Download the firmware file from above and extract the zip on your desktop.
- Download and install Samsung USB Drivers Or Kies if you do not have it already installed.
- Charge you phone to ensure decent battery level.
- Backup your phone’s data like apps, contacts, messages, etc. Use These Apps to do it.
Installing the firmware:
- Boot your phone in Download mode by pressing and holding the Volume Down+Home+Power buttons at the same time and then press Volume Up when prompted to enter Download mode.
- Launch Odin and connect your device to PC.
- Do not touch anything on Odin and click the AP button. Then select the file with.tar.md5 extension from the firmware folder.
- Make sure your Odin’s setup looks like this:
- Now click the Start button on Odin.
- When the installation is finished, you’ll get a PASS!! message and your device will reboot.
- Wait till it boots up properly and start enjoying the new Android 4.3 firmware,
If you experience issues like bootloop or poor performance after installing the firmware, perform a “data/factory reset” via Recovery mode.
Subscribe to:
Posts (Atom)